Sunday, September 25, 2011

Cornbread/Corn Muffins

Last week I made chili for the Pat's game viewing at our house. When I made the chili I made it two, maybe three alarm and needed to put the fire out on our palettes some how, and thought bread would be good. But really did not want just white bread. Then it came to me, cornbread!!!

I have never made cornbread before and really thought I was not really a cornbread fan. Think about it every time you stop by Boston Market to get a quick dinner they seem to give cornbread but most of ours seems to go in the trash. This month thought cornbread was one of the feature recipes in Everyday Food magazine. (Yes, I love Everyday Food magazine.) And for some reason the cornbread looked so good and looked so easy to make, so I thought why not make cornbread to put the "chili fire out."

The one thing I have to say is when I made my cornbread I wanted to make it "user friendly." Meaning I made corn muffins with the same recipe so everyone could take a bowl of chili and a muffin. Such a good idea when there is a crowd. And I could freeze all the ones we did not eat for the next time I make chili or want a corn muffin with butter for breakfast.

This is what I did ...

Cornbread

1/2 cup or 1 stick of unsalted butter at room temperature
1 1/2 cup of yellow cornmeal
1 cup of leveled all purpose flour
6 tablespoons of sugar
1 1/2 teaspoons baking powder
1 teaspoon of salt (if you only have salted butter omit this salt)
1/2 teaspoon baking soda
1 cup of buttermilk
3 large eggs

Preheat your oven to 400 degrees. Either butter an 8" baking pan or line a muffin pan with cupcake liners.

In a large bowl mix the dry ingredients in a large bowl; cornmeal, flour, sugar, baking powder, salt, and baking soda. In a second bowl mix the wet ingredients; melted butter, buttermilk & eggs. Add the dry ingredients to the wet and stir till combined, but do not over mix.

Transfer to pan or muffin cups and bake.

When making one bread bake for 20-25 minutes, when making muffins bake for 12-15 minutes. In both cases bake till toothpick when inserted in center comes out clean.


This cornbread recipe came out so good, not too sweet and not too savory, they were pretty much perfect. I think there are many ways this cornbread base can go from sweet to savory with other flavors added to it as well.


Try this even if you are not a fan of cornbread, you might be like me and like it after all.


YUM!!!

Daddy Dan's Famous Chili

This is my favorite time of year, for a couple of reasons; one is the the leaves are changing and the air is getting colder, and the other is football season is here. I cannot tell a lie I do love to watch the home team (New England Patriots), as well as all the other Sunday afternoon games. Football watching in our house is also a social thing to do and that means so much good food while watching the game.

This weekend the Pat's are away so there will be be some friends here to watch the game. What to make is the big question? Chili!!!

About 20 years ago my Dad was in a Chili cook-off, and his was one of the top 5. His recipe is one that can be hot or can be not so hot. But one thing for sure it is so yummy and a crowd pleaser. It has heat when you eat it, then the flavors of the chili and then after heat that makes you go back for more.

This is what do ...
Daddy Dan's Famous Chili
3 tablespoons of olive oil
2 cloves of garlic, minced
1 medium onion, diced
1 jalapeno, diced (omit if you do not like you chili hot)
2 lb. of beef tips, cut into one in cubes
1 bottle of beer (no stout), I used New Castle Brown Ale
1 cup of water
2 can of diced tomatoes
2 can of dark red kidney beans, drained
2 teaspoons of salt
1 teaspoon of black pepper
1/8 teaspoon dried sage
1/2 teaspoon dried oregano
1/4 teaspoon cayenne pepper
1 teaspoon cumin
1 table spoon chili power

In a large stock pot saute the garlic, onions and jalapeno with a pinch of salt till onions are browned. Add the beef and the spices/aromatics. Simmer till beef is browned on all sides (5-8 minutes).

Add the tomatoes, water and beer, bring to a boil and simmer for 2 1/2-3 hours.

After 3 hours remove the beef and pull apart like pulled pork.

Add the beans and stir for 10 minutes and serve, or allow to fully cool before setting aside in the fridge for the next day.


I shoul tell you that when I made this I made a smaller batch and cut the tomatoes, beans, and meat in half to make a smaller pot. But I did keep all the aromatics in the same quantity for intense flavor.

Keep in mind that this is a dish that need to be made the day before. All the flavors of Chili need to marry together and settle before you can really enjoy how good it is, and watch some of the game while it is heating up on the stove for a half time meal.

As you can see we added some fresh avacado and diced sweet white onions, and fresh cilantro to our chili and served it with corn bread (to help pt out the "fire", recipe to come this week). You can also add cheese, but since we are lactose intollerant we can do without the cheese and still love every bite.

If you try this recipe let me know and I will tell Dad, he loves to hear who I pass this recipe on to and what they think of it.

YUM!!!!

Sunday, September 11, 2011

Chicken Supreme

I am always on a quest to find new things to cook for my husband and I. Cooking the same thing every week gets really really boring in my opinion so I am constantly looking all the time for new recipes. Let me start by saying I subscribe to Daily Candy, an on-line site that sends you a Daily message about "eye" candy that is sometimes useful but mostly is stuff I dream about. Every day I look forward to the Candy no matter what it is. Last week Daily Candy sent me a email Titled "What's for Dinner?" This really intrigued me, I had to find out more about it.


It was all about an on-line web site dedicated to helping you find what you want to eat for dinner based on what you tell, such as meat, veggie, etc. The site is called Gojee, and I suggest you all get a Gojee account. I love it, and I have only used it once. Gojee is all about other recipe blogs and how to find the perfect meal to make for dinner. You see when you find a recipe you like Gojee links you to the blog that the recipe is on so you can view it, print it, etc. The nice thing is you can save your recipes on the Gojee site for later reference and not worry about where you were linked to.


I got very excited about this and set up an account right away, and started searching for new recipes to create. We seem to always have chicken thighs on hand so I thought lets look for a new recipe using thighs. There are so many it was very hard to choose what would be my first one. But there was one that sounded really good that I had to try it ... Chicken Supreme, which was originally from Taste and Tell (blog).

This is how to make Chicken Supreme
5-6 boneless & skinless chicken thighs
3/4 teaspoon of seasoned salt (I used Pappy's Choice)
pinch of paprika
1 cup chicken stock/broth
1/4 cup white wine (I used white cooking wine you can purchase at the grocery store)
1/4 cup diced onion
1/4 teaspoon curry powder
pinch of fresh cracked pepper
2 tablespoons of all-purpose flour
1/4 cup cold water
1 cup sliced mushrooms (10 sliced button mushrooms)
olive oil

Preheat oven to 350 degrees. Sprinkle thighs with seasoned salt and paprika. Place chicken in a 9x13 baking dish.

In a small bowl combine chicken broth, wine, onions, curry powder and pepper. Pour over chicken. cover with foil. Bake for 30 minutes, then uncover and bake for 45 minutes, or until chicken is done.

While the chicken is in the oven, heat a small amount of oil in a skillet and saute the mushrooms till tender. set them aside.

When chicken is done remove from oven. Take the chicken out of pan and cover to keep warm. Strain the pan juices and reserve for the sauce.

In a small sauce pan whisk the flour and water, slowly whisk in the pan juices. Cook on low heat and whisk until sauce get thicker. Boil for 3-4 minutes. Add the mushrooms to the sauce.

Serve chicken with the sauce.


As you can see we also had some sauteed asparagus with it. It was so yummy!!! we both used the bread to sop up all the sauce left behind on our plates.


YUM!!!

Tuesday, September 6, 2011

Creamless Corn Chowder

This is one of those recipes that we have been looking for, for such a long time. As you already know my husband is lactose intolerant and seems to like to eat everything that has cream, milk and cheese in it, and regrets eating all those things a few hours later. So every time I find a recipe that usually has dairy in it but can be made without it I jump to make it. For a couple of reasons; (1) to see how good it is without diary and (2) to see if my husband would love it as much as the original.


Sunday morning I was drinking tea & eating toast flipping through the ads in the Sunday paper and came across this recipe in the USA Weekend magazine. For some reason every Sunday I flip through the USA Weekend for celebrity birthdays and the occasional feel good story, and this week for the awesome recipe I found. Since my husband and I both love corn chowder but just cannot eat it because it has too much dairy, this is such a refreshing change to a great chowder. I knew I had to try this recipe and see how yummy it is without cream.

This is what I did ...

Creamless Corn Chowder
2 cups of frozen corn
2 cups of cream of corn (I used one can of cream of corn)
1 large onion, medium dice
1/2 red pepper medium dice
2 large potatoes (I used two large Yukon Gold potatoes) medium dice
salt n pepper
4 slices of bacon (chopped)
1 teaspoon if dried thyme
1 quart of chicken broth/stock
2 tablespoons of fresh cilantro

Slice the bacon into small pieces and put in a large stock pot and fry over medium-high heat until crisp (5-7 minutes). Chop the onion and the pepper and season with salt and pepper. Add the onion & pepper to the bacon and saute. After the onions start to sweat add the cream corn and thyme. Stir to combine. Add the frozen corn, potatoes and chicken broth. Let simmer for 30 minutes.

Serve with a sprig of fresh cilantro.


This was such a yummy dish, even my husband loved it. He is now waiting for the cold to come so we can eat chowder by the fireplace on a cold winter day.


If you or anyone in your home is lactose intolerant this is a recipe for you, there is so much flavor you will not even miss the dairy.


YUM!!!

Friday, September 2, 2011

Succotash

Let's talk about Succotash today. This is one side dish I really had no idea what it was, not thought I would ever be so much in love with Succotash that I would make it so often. It all started a few months ago I went to all places The Cheesecake Factory for lunch with some family. They had this great BBQ Salmon dish with mashed potatoes and corn with veggies in it. I knew after I ate it I had to replicate it for my husband, because I knew he would love it.

The big question is what is a Succotash ... The definition of Succotash is "boiled corn kernels" in a dish primarily of corn and/or Lima beans/shelled beans, other ingredients can be added to it such as tomatoes, and green or red bell peppers. Because of the relatively inexpensive and more readily available ingredients, the dish was popular during the during the Great Depression, and with today's market going up & down why not try a cheep side dish for your family.

The fact that Succotash is so easy to make, makes it a perfect side dish in our house... and have I mentioned that my husband loves corn.

My Succotash is made this way
1 -1 1/2 cups of frozen corn
half red bell pepper diced
half zucchini diced
1 tablespoon organic butter
salt-n-pepper to taste

Mix the ingredients in a small sauce pan. Put on stove top on high, and stir constantly till butter is melted. When butter is melted cover and turn off heat. The steam from the corn will keep the veggies warm till you eat them.


The nice thing about Succotash is all you need is corn and diced veggies and you can make it your own. when you make your own ... share it with me, I am always looking for new veggies to add to my corn.

YUM!!!

Tuesday, August 16, 2011

Roasted Beef, Mushrooms and Barley Soup

It is the middle of of one of the hottest summers on record and for some reason the other day I was craving hot soup. Sometimes when I crave soup I just open a can and heat it up over the stove and slurp away. This week was different than other summer days ... I wanted real home made soup, that was quick and hearty. (I was also just at a family party and everyone was talking about my cooking and why have I not posted anything in a while. It in a way inspired me to make this soup also.) But I digress ... back to the original recipe.

This was a soup that I originally found in Everyday Food Magazine and it looked so easy and so yummy I had to give it a whirl. It only has 5 real ingredients!!! Funny how I sound like a TV show on Food Network all of a sudden. But it is is true. It seriously only has 5 ingredients that make this one of the easiest, hearty and flavorful soups you will ever eat, in my opinion.

Beef, Mushroom & Barley Soup
1 lb. of beef chuck cut into 1" cubes
1 lb. of button mushrooms (steamed and cut in half)
1 cup of chopped onions (can be anything shallots, red, vadalia, pearl or white)
salt n pepper
2 tablespoons of olive oil
4 cups of beef broth
1/2 cup of quick cooking barley

On a cookie sheet spread out the onions, mushrooms, and beef to make one layer. Drizzle the olive oil over it and season with salt n pepper, in a 400 degree oven for 30 minutes to brown .

Remove form the oven and transfer to a dutch oven or stock pot. Add the barley and the beef broth. Bring to a boil and simmer till barley is soft, approximately 12 minutes.


I have made this soup for many family & friends and they have all been very happy with the dish. This is one of those dishes that is so much better the next day and the day after.


Try this one ... it takes less than an hour and is so easy.


YUM!!!

Tuesday, April 5, 2011

Stuffed Turkey Breast

One thing everyone should know about me is I love to shop at Costco for crazy things like toilet paper, paper towels, and poultry. Yes poultry!!! I find that Costco has great chicken and turkey, and at such good prices it is sometimes hard for me not to purchase it when I am shopping.

A few weeks ago I was having coffee with some friends, and we were talking about all the ways we make turkey, from stuffed, to glazes, to fixings with it. Then the turkey breast came up in conversation. I had never thought to make just a breast before. The brain started working. The idea I had was what if I butterflied the turkey breast and stuffed it with stuffing and wrapped it in bacon, and bake it. You know anything in bacon tastes good.


That is exactly what I did. My husband helped me with the butterflying of the meat. When my husband was in high school he was a part time butcher at a small grocery store, where he learned how to cut meat like a pro. After the turkey was cut I pounded it a bit to tenderize it and make it flat. Next the stuffing was added (I used mt own recipe for homemade stuffing with pecans & dried cranberries). This is when it gets tough ... the stuffing must be placed in a log like shape at one end of the breast. Then roll the stuffing inside the turkey.


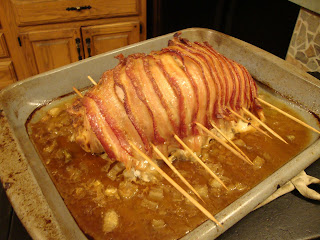
This was really starting to look good but it needed something to make it really juicy. That would be bacon. I used a half a pound of maple cured bacon to wrap the complete exterior of the rolled breast. We also used skews to hold the roll in place while cooking. A 1 - 1 1/2 cup of chicken stock was added to bottom of the pan for some liquid on the bottom of the pan, and a medium onion diced and added to the bbroth for flavor.


This is what it looked like when it came out of the oven. We let it rest for a few before cutting it so the juices would stay in the meat.


When the turkey was cut it was a perfect pinwheel. The maple flavor of the bacon and the tart dried cranberries in the stuffing give each bit of this pleasing to the palette.


This was the first time I made this dish and was a bit nervous, because I was having a few friends over for dinner that night and was hoping it would be good. As it turns out it was great and one of our guests said "this is something I would have expected to get at a restaurant." that made me feel so good.


Note to Self: Get another turkey breast on my next trip to Costco.


One last thing to mention is that when the turkey came out of the pan and they was "juice" left behind I strained and de-fatted the liquid put it in a small sauce pan, added 2-3 tablespoons of unsalted butter and a tablespoon of flour and whisked to make gravy. The gravy helped to tie the entire dish together.


YUM!!!