Now that I am back I have been baking and cooking up a storm and my house just smells wonderful everyday. My husband comes home and looks forward to the "next" great meal.
The more I look at the way Americans eat the more I want to make things in my own kitchen over buying them; IE processed foods. It only takes a bit of time and a bit of fore thought and you can know what you are eating.
Over the past few weeks I have been looking more & more at what my husband & I eat. We shop mostly in the outer ring of the market (and if we do buy something in the aisles it is organic). We have planted our first garden and cannot wait to reap the "fruits of our labor" in a few months. But mostly I have been looking to making more things home-made and less store bought.
One thing we eat a lot of ... or a loaf of a week is bread. So I thought to myself why not make bread and if I make enough of it, I can freeze it. I love toast. Yes it is a strange thing to love but it is one of my favorite things to eat, and since I eat toast everyday with breakfast, bread is a perfect thing to make home made in place of processes bread. There are so many recipes for bread on the web you can get very over-whelmed by them. The one I used came from All Recipes and was very easy to make.
This is what I did
Wheat Bread
3 cups of warm water
2 packages of dry active yeast
1/3 cup of honey
5 cups of bread flour
3 tablespoons of melted butter
1/3 cup of honey
1 tablespoon of salt
3 1/2 cups of whole wheat flour
2 tablespoons melted butter
In a large bowl, mix warm water, yeast, and 1/3 cup
honey. Add 5 cups white bread flour, and stir to combine. Let set for
30 minutes, or until big and bubbly.
Mix in 3 tablespoons melted butter, 1/3 cup honey,
and salt. Stir in 2 cups whole wheat flour. Flour a flat surface and
knead with whole wheat flour until not real sticky - just pulling away
from the counter, but still sticky to touch. This may take an
additional 2 to 4 cups of whole wheat flour. Place in a greased bowl,
turning once to coat the surface of the dough. Cover with a dishtowel.
Let rise in a warm place until doubled.
Punch down, and divide into 3 loaves. Place in
greased 9 x 5 inch loaf pans, and allow to rise until dough has topped
the pans by one inch.
Bake at 350 degrees F (175 degrees C) for 25 to 30
minutes; do not over bake. Lightly brush the tops of loaves with 2
tablespoons melted butter or margarine when done to prevent crust from
getting hard. Cool completely and serve.
Now that I have started to make my own bread I cannot go to the store and buy bread, it just is not the same.Yes it takes a bit of time and a bit of work but in the end it is so worth it to make your own bread.
YUM!!!
Showing posts with label Frugal Find. Show all posts
Monday, May 21, 2012
Monday, December 26, 2011
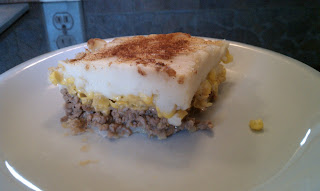
Shepard's Pie
Shepard's Pie is one of those dishes that I did not grow up as a child eating but fell in love with after I met my husband. He is that kind of guy who really likes comfort food as much as he likes to eat out at fine restaurants, makes for very eclectic meals. And believe it or not it was my husband who taught me how to make Shepard's Pie.
In the past I have blogged about Cottage Pie which is quite similar to Shepard's Pie but has more ingredients and takes more time to prepare. The nice thing about Shepard's Pie is there are really only three ingredients that make this delicious dish.
Here is what you do ...
Shapard's Pie
1 1/3-1 1/2 lbs of ground meat (ground turkey, ground beef or meatloaf mix will suffice)
salt n pepper (or your favorite seasonings)
1 can of cream corn
1 cup of frozen corn (frozen corn has more flavor than canned corn)
5-6 medium potatoes (boiled and mashed)
Cook the ground beef in a skillet till golden brown. Add the salt n pepper and favorite seasonings while cooking meat. I also sometimes add a sauteed onion and crushed garlic for more flavor.
When meat is finished drain all the grease and cover bottom of 9 x 13 baking dish.
Cover the meat with the can of cream corn and add a layer of the frozen corn.
Lastly cover top with mashed potatoes. You can also sprinkle some cheese and paprika over top for flavor.
Bake in over for 30-45 minutes. Let rest for 5-10 minutes before serving.
In the past I have blogged about Cottage Pie which is quite similar to Shepard's Pie but has more ingredients and takes more time to prepare. The nice thing about Shepard's Pie is there are really only three ingredients that make this delicious dish.
Here is what you do ...
Shapard's Pie
1 1/3-1 1/2 lbs of ground meat (ground turkey, ground beef or meatloaf mix will suffice)
salt n pepper (or your favorite seasonings)
1 can of cream corn
1 cup of frozen corn (frozen corn has more flavor than canned corn)
5-6 medium potatoes (boiled and mashed)
Cook the ground beef in a skillet till golden brown. Add the salt n pepper and favorite seasonings while cooking meat. I also sometimes add a sauteed onion and crushed garlic for more flavor.
When meat is finished drain all the grease and cover bottom of 9 x 13 baking dish.
Cover the meat with the can of cream corn and add a layer of the frozen corn.
Lastly cover top with mashed potatoes. You can also sprinkle some cheese and paprika over top for flavor.
Bake in over for 30-45 minutes. Let rest for 5-10 minutes before serving.
This is one of those dishes that gets better with age. We find that the second day is much better than the first.
So when you are in a bind for what to make for dinner, if you have corn, ground meat, and potatoes try this great Yummy dish.
YUM!!!
Friday, September 2, 2011
Succotash
Let's talk about Succotash today. This is one side dish I really had no idea what it was, not thought I would ever be so much in love with Succotash that I would make it so often. It all started a few months ago I went to all places The Cheesecake Factory for lunch with some family. They had this great BBQ Salmon dish with mashed potatoes and corn with veggies in it. I knew after I ate it I had to replicate it for my husband, because I knew he would love it.
The big question is what is a Succotash ... The definition of Succotash is "boiled corn kernels" in a dish primarily of corn and/or Lima beans/shelled beans, other ingredients can be added to it such as tomatoes, and green or red bell peppers. Because of the relatively inexpensive and more readily available ingredients, the dish was popular during the during the Great Depression, and with today's market going up & down why not try a cheep side dish for your family.
The fact that Succotash is so easy to make, makes it a perfect side dish in our house... and have I mentioned that my husband loves corn.
My Succotash is made this way
1 -1 1/2 cups of frozen corn
half red bell pepper diced
half zucchini diced
1 tablespoon organic butter
salt-n-pepper to taste
Mix the ingredients in a small sauce pan. Put on stove top on high, and stir constantly till butter is melted. When butter is melted cover and turn off heat. The steam from the corn will keep the veggies warm till you eat them.

The nice thing about Succotash is all you need is corn and diced veggies and you can make it your own. when you make your own ... share it with me, I am always looking for new veggies to add to my corn.
YUM!!!
The big question is what is a Succotash ... The definition of Succotash is "boiled corn kernels" in a dish primarily of corn and/or Lima beans/shelled beans, other ingredients can be added to it such as tomatoes, and green or red bell peppers. Because of the relatively inexpensive and more readily available ingredients, the dish was popular during the during the Great Depression, and with today's market going up & down why not try a cheep side dish for your family.
The fact that Succotash is so easy to make, makes it a perfect side dish in our house... and have I mentioned that my husband loves corn.
My Succotash is made this way
1 -1 1/2 cups of frozen corn
half red bell pepper diced
half zucchini diced
1 tablespoon organic butter
salt-n-pepper to taste
Mix the ingredients in a small sauce pan. Put on stove top on high, and stir constantly till butter is melted. When butter is melted cover and turn off heat. The steam from the corn will keep the veggies warm till you eat them.

The nice thing about Succotash is all you need is corn and diced veggies and you can make it your own. when you make your own ... share it with me, I am always looking for new veggies to add to my corn.
YUM!!!
Monday, November 29, 2010
Peanut-Rasin Granola Bars
Last week I was looking through my pantry for a snack and found so many different granola bars. Some we like and some we are not too fond of but still eat, but there were so many. And they all have such crazy ingredients in them, some I cannot even pronounce, I thought they were healthy treats but when you have no idea what is in them how can be healthy.

I seem to be on the kick on making everything we put in our bodies at my house. It may take a bit of time and energy but in the long run now you know what is it so you know how healthy it is. The other nice thing about making more of the things you eat is the love that you put in each meal you cook. Love translate in taste, flavor, and texture ... believe me when someone makes something with love it shows.
This is how I made my granola bars ...
cooking spray
2 1/2 cups organic rolled oats
1 cup dry roasted peanuts
1 cup of raisins (or 3 boxes of Sunmaid raisins)
1 cup organic sunflower seeds, hulled
1 1/2 teaspoons ground cinnamon
1 1/2 teaspoon ground nutmeg
1 14oz can of sweetened condensed milk
1 stick of unsalted butter, melted
Preheat oven to 325degrees. Line a rimmed cookie sheet with foil and coat with cooking spray.
Mix the oats, peanuts, raisins, seeds, cinnamon, nutmeg, condensed milk and butter in a bowl. Bake in oven till golden brown, about 45 minutes. Cool slightly, flip over, peel off the foil and cut into bars.
These are such a yummy treat when you need a pick-me-up. Thinking of using dried cranberries, mini chocolate chips, and possible chocolate drizzle on future ones. Maybe even candied ginger or dried apricots. Wow the possibilities are endless.
YUM!!!
Sunday, November 28, 2010
Cottage Pie
I would like to start by saying for the past few weeks I have been looking for a mandolin slicer. But I have not been able to find one, or maybe find one I like. So the other day my Mom & Dad came over to visit and they gave me a mandolin slicer they found while they were out shopping. How sweet of them to find a tool I have been looking for. Now no more looking and lets get slicing.
Last months issue of Everyday Food Magazine had a Cottage Pie on the cover. This very beautiful Pie in a casserole dish with thinly sliced potatoes as the "top crust." All I wanted to do was make this beautiful dish. After receiving the mandolin slicer I knew this was the first dish I was going to make with this new kitchen tool.


Last months issue of Everyday Food Magazine had a Cottage Pie on the cover. This very beautiful Pie in a casserole dish with thinly sliced potatoes as the "top crust." All I wanted to do was make this beautiful dish. After receiving the mandolin slicer I knew this was the first dish I was going to make with this new kitchen tool.
I am such a fan of comfort food and things that make you feel good inside and out. They make the house smell wonderful in the winter and warm the soul of all those who pop in for a visit unexpectedly during the winter.
This dish has other advantages in that you can use what you have in your fridge to make it. Most of these ingredients can be exchanged for something different and it can still be considered a Cottage Pie. The original way to make Cottage Pie is to use Lamb but since Turkey day was just upon us I substituted Turkey for the Lamb and it was such a yummy idea.
This is what I did ...
3 tablespoons of unsalted butter
1 large onion, diced
2 large carrots, sliced
coarse salt & pepper
2 tablespoons of tomato paste
2 1/2 cups of minced turkey (both dark and white meat)
2 teaspoons of dried thyme
1 cup larger beer
2 tablespoons all-purpose flour
3/4 cup frozen peas
2 Yukon gold potatoes, thinly sliced
Preheat oven to 400 degrees. In a large skillet, heat 1 tablespoon butter over medium-high. Add onion and carrots and cook, stirring often, until onion is soft, 5 minutes. Season with salt and pepper and stir in tomato paste. Add meat and cook, until almost cooked through, 3 minutes. Add thyme and beer and bring to a boil. Cook, stirring frequently, until slightly reduced, 2 minutes. Sprinkle flour over mixture and stir to combine. Add 1 cup water and cook until mixture thickens, about 2 minutes. Stir in peas and season with salt and pepper.
Transfer mixture to a casserole like baking dish. Top with sliced potatoes, overlapping slices. Season potatoes with salt and pepper and drizzle with 2 tablespoons butter. Bake until potatoes are browned around edges and tender when pierced with a knife, 40 to 45 minutes. Then put in broiler for 5-10 minutes to crisp up the edges of the potatoes.
Let sit for 10 minutes to "settle and rest" before serving.
My husband thought this dish was so yummy he cannot wait for me to make it again. We although thought the next time we make it was are going to add 3/4 cup of frozen corn to add another level of sweetness.
As you can see there is so much you can do with this recipe from different meats you can use to veggies that can go in it makes it a frugal find, for what you have in your fridge you can use and it will come out just as yummy. It is so easy and looks so nice when finished it can even make a great casual dinner for you and another couple for a weeknight dinner
YUM!!!
Thursday, February 11, 2010
Steak Bombs
Steak Bombs are one of those yummy local sub shop finds that we all crave and love when they are cooked right but we know deep down that maybe it is not such a good idea when we are finished eating them.
A few years ago my husband bought me a griddle to go over my burners on my stove. Up until now we used it to make omelets, pancakes and french toast, but other than breakfast we really did not use it that much, until we found the shaved steak at the market. Shaved steak is very cheep at $2.99lb. and very good when cooked on a griddle. We thought why don't we make our own steak bombs at home.
This is what we do ...
Steak Bombs
1 lb. shaved steak
1/2 sliced bell pepper
1/2 sliced onion
1 tablespoon olive oil
salt n pepper to season
4 soft sub rolls
4 pieces of American cheese
Slice up the onions and the peppers and toss in olive oil and salt n pepper. Put on griddle and cook until fork tender. Remove the veggies from the griddle and cook the shaved steak in the oil and seasonings left over on the pan.
Slice rolls in half and line bottom of rolls with cheese. Add the meat to rolls while still hot so the meat melts the cheese. Top with veggies.
YUM!!!
The Gluten-Free version ... instead of using bread try taco shells.
Monday, December 28, 2009
Turkey Soup
Turkey Soup
Put the stock pot back on the stove top and bring to a boil. Turn down heat and keep on low for at least another hour.

What better thing to do with your turkey carcase but to make turkey soup. This has go to be one of the easiest things to make, and since you are most likely using items in your kitchen, that makes this a Frugal Find also. This though does need some fore-thought after you have carved your turkey. Take the carcase and place it in a large stock pot and put it in a cold place till you can get to it (mine sat in my 3 season porch overnight, the coldest place in my house that night).
When you are ready to make the soup fill the stock pot 3/4 or more with tap water. Cover the pot and bring it to a boil. Let it boil for a good hour. The idea is for all the meat to fall off the bone. At this point there is no need for seasoning, for the turkey will do all the work (if there is any skin left over please add that to the pot, the flavor can boil out of it too and can be discarded later).
After the hour has passed you can de-bone the turkey. This is a bit of a tedious process, but well worth it in the end. This cavity of so you think tiny bits of meat and skin will not only give you amazing flavor on their own but they will give way more meat than you can imagine. The amount of meat you will get will make your soup into stew.
No is time to add the following
2 cups carrots chopped
2 large onion chopped
1 celery heart chopped
1 medium/large potato peeled and diced
salt n pepper to taste
(fresh cilantro or parsley can be added if you have them on hand in you fridge)
Put the stock pot back on the stove top and bring to a boil. Turn down heat and keep on low for at least another hour.
You can serve it now but since turkey has more fat than chicken it is a good idea to cool the soup in your fridge overnight so the fat can rise to the surface of the soup and can be skimmed off the top.
After skimming the fat reheat the soup and serve. The soup can also be put in freezer containers and saver for later meals.
A perfect dinner for those cold January nights, warm home-made soup!!! Yum!!!
Saturday, December 26, 2009
Sweet Crescent Rolls
This morning I was trying to figure out what can I make for breakfast that is not only easy but looks good too. Then it came to me ... I forgot to make the crescent rolls last night with dinner maybe I can use them to make some yummy pastry. That is just what I did, a Frugal Find for breakfast ... how sweet is that.
Sweet Crescent Rolls
Cinnamon Rolls
1 package of Crescent rolls
1 egg (for wash)
1 tablespoon sugar
1/8 teaspoon cinnamon
pinch of ground nutmeg
pinch of ground cloves
Preheat oven according to Crescent Roll package. Unroll the dough and tear accordingly to make 8 rolls. In a small bowl beat one egg to make an egg wash, then brush the egg over each of the triangles. In a small bowl combine the sugar, cinnamon, nutmeg and clove (you can also use pumpkin pie spice in place of all of these). Once all the triangles have been egg washed sprinkle with the sugar mix. Roll into crescents. Egg was the finished crescent roll and sprinkle with sugar. This will give the outside a nice flaky top.
Bake accordingly.
Serve hot.
YUM!!!
Raspberry Turnover Crescent Rolls
1 package of Crescent Rolls
4 tablespoons of raspberry jam*
1 egg (for wash)
pinch of sugar
Preheat oven according to Crescent Roll package. Unroll dough and tear accordingly to make 8 rolls. In a small bowl beat one egg to make an egg wash, set aside. At widest end of triangle dob 1/2 tablespoon of jam. Fold over the tips of triangle to form an enclosed turnover. Egg wash the finished turnover and sprinkle with sugar.
Bake accordingly.
Let cool a few minutes before serving for jam is very hot and can burn.
YUM!!!
*In the case of the jam version, any jam will do. if you like another it can be used in place of the raspberry, the sky is the limit, or what you can find at the local market.
Monday, December 7, 2009
Guacamole
Guacamole is one of those "dips" you either love or you hate. I keep getting mixed reviews about it ... but one thing I know for sure is I Love it!!! (and if you like Guacamole like I do and if ever you travel to Cozumel, Mexico you need to Stop at Playa Bonita's for some Home-made Chips and Guacamole and an Ice cold Margarita. Did I also mention it is one of the most beautiful beaches I have ever been to in the Caribbean). Well, Enough about the best ... lets talk about my Frugal Find.
The other day I was at Trader Joe's looking to pick up items that will go well for watching a Football Game . Low and behold i came across the coolest thing in the store ... well, the coolest thing in the produce section. The "Guacamole Kit." At first I passed right by it and went looking for avocados, tomatoes, limes, onions, etc. Then went back to find it was only $2.99 ... and it had it all for way less than I was paying for the items in my basket. I bought the "Kit" and the Guacamole was the best I have ever made.
This is the "Kit"
2 Avocados
2 Plum Tomatoes
1 Lime
1 Clove of Garlic
1 Onion
1 Jalapeño Pepper
Salt n Pepper to taste
Peel and dice the onion and garlic, dice the
jalapeño pepper, and Peel, Un-pit, and dice the avocado. Combine all this into a bowl and mash until it is to your desired consistency. Dice the tomatoes and add to the mixture. Add the juice of the lime and salt and pepper to taste. You may also want to add a few sprigs of fresh Cilantro to give it that straight from Mexico taste.
The best thing about this, is I know what was in it, all fresh ingredients, nothing processed and nothing from a can. It may take a few more minutes to prepare but when there is none left ... you don't feel guilty about eating any of it.
This is the first installment of Frugal Finds ... as I find more I will post them. Frugal Finds will be a section dedicated to finding things that are still home-made but seem to be Way Cheaper than buying store bought brands.
Subscribe to:
Posts (Atom)