Monday, May 21, 2012

Wheat Bread

Now that I am back I have been baking and cooking up a storm and my house just smells wonderful everyday.  My husband comes home and looks forward to the "next" great meal.  

The more I look at the way Americans eat the more I want to make things in my own kitchen over buying them; IE processed foods.  It only takes a bit of time and a bit of fore thought and you can know what you are eating.

Over the past few weeks I have been looking more & more at what my husband & I eat.  We shop mostly in the outer ring of the market (and if we do buy something in the aisles it is organic).  We have planted our first garden and cannot wait to reap the "fruits of our labor" in a few months.  But mostly I have been looking to making more things home-made and less store bought.

One thing we eat a lot of ... or a loaf of a week is bread.  So I thought to myself why not make bread and if I make enough of it, I can freeze it.  I love toast.  Yes it is a strange thing to love but it is one of my favorite things to eat, and since I eat toast everyday with breakfast, bread is a perfect thing to make home made in place of processes bread. There are so many recipes for bread on the web you can get very over-whelmed by them.  The one I used came from All Recipes and was very easy to make. 

This is what I did

Wheat Bread 
3 cups of warm water
2 packages of dry active yeast
1/3 cup of honey
5 cups of bread flour
3 tablespoons of melted butter
1/3 cup of honey
1 tablespoon of salt
3 1/2 cups of whole wheat flour
2 tablespoons melted butter

In a large bowl, mix warm water, yeast, and 1/3 cup honey. Add 5 cups white bread flour, and stir to combine. Let set for 30 minutes, or until big and bubbly.

Mix in 3 tablespoons melted butter, 1/3 cup honey, and salt. Stir in 2 cups whole wheat flour. Flour a flat surface and knead with whole wheat flour until not real sticky - just pulling away from the counter, but still sticky to touch. This may take an additional 2 to 4 cups of whole wheat flour. Place in a greased bowl, turning once to coat the surface of the dough. Cover with a dishtowel. Let rise in a warm place until doubled. 

Punch down, and divide into 3 loaves. Place in greased 9 x 5 inch loaf pans, and allow to rise until dough has topped the pans by one inch. 

Bake at 350 degrees F (175 degrees C) for 25 to 30 minutes; do not over bake. Lightly brush the tops of loaves with 2 tablespoons melted butter or margarine when done to prevent crust from getting hard. Cool completely and serve. 


Now that I have started to make my own bread I cannot go to the store and buy bread, it just is not the same.Yes it takes a bit of time and a bit of work but in the end it is so worth it to make your own bread.

YUM!!!

Sunday, May 6, 2012

Lemon Bars

I'm back!!!

I had to take a break from Blogging for a while.  But I am back now!!! It took much thought and many folks asking where I have been and why have I not added anything new, today is the day I come back to blogging and talking about food.  And who doesn't love talking about food.

A few weeks ago I ended up with the biggest bag of lemons in my kitchen and they were slowly starting to go bad.  I wanted to use them for something yummy but could only think of lemon meringue pie, which is one of my favorite desserts, but this was not the answer.  I searched though many magazines and on-line sites then I found it ... Lemon Bars.  They are rich, tart, and so yummy.

Lemon is that flavor that can be so luscious, since it can be sweet to tart and all in the middle.  I found a recipe in Food Network Magazine, that had no picture but all these ingredients listed and it sounded easy and yummy, knew this was the one. 

This is what I did ...

Lemon Bars 
for the CRUST
Vegetable oil for greasing
1 1/2 sticks of cold unsalted butter, diced
2 cups of all purpose flour
1/4 cup of packed brown sugar
1/4 cup of confectioners sugar
1/4 teaspoon of salt

for the FILLING
4 large eggs plus 2 egg yolks
2 cups of granulated sugar
1/3 cup of all purpose flour
1 teaspoon of lemon zest
1 cup of fresh squeezed and strained lemon juice (6-8 lemons)

To make the crust: preheat oven to 350 degrees.  Grease a 9x13 foil lined pan with the oil, leaving 2 inch overhang on all four sides.  Combine butter, flour, both sugars, and salt in food processor or stand mixer, until dough comes together.  Press it evenly into the bottom of the pan, make sure there are no cracks.  Bake crust till golden brown, approx 25 minutes. 

While the crust is in the oven, now its tame to make the filling.  Whisk all the eggs, sugar, and four until smooth.  Whisk in the lemon zest and juice. 

Remove the crust from the oven and reduce the temperature to 300 degrees (and if you forget don't worry, they will still come just as good).  Pour the filling over the crust and return to oven for 30-35 minutes.

Let the bars cool in the pan, then move to the refrigerator to completely cool, and become firm (approx 2 hours.  Using the foil lift out of the pan and cut into squares or bars.  Dust with confectioners sugar before serving. 


One of the greatest things about the recipe is the fact that the Microplane can be used.  This is my new favorite kitchen tool.  I never thought I would love it so much but I do and everyone should get one.  the zest it makes is so fine and delicate, it keeps the filling smooth & creamy.  A must have for anyone. 

So if you love lemon as much as I do you should try this dessert.

YUM!!! 


Monday, December 26, 2011

Shepard's Pie

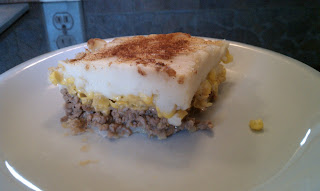
Shepard's Pie is one of those dishes that I did not grow up as a child eating but fell in love with after I met my husband. He is that kind of guy who really likes comfort food as much as he likes to eat out at fine restaurants, makes for very eclectic meals. And believe it or not it was my husband who taught me how to make Shepard's Pie.

In the past I have blogged about Cottage Pie which is quite similar to Shepard's Pie but has more ingredients and takes more time to prepare. The nice thing about Shepard's Pie is there are really only three ingredients that make this delicious dish.

Here is what you do ...

Shapard's Pie
1 1/3-1 1/2 lbs of ground meat (ground turkey, ground beef or meatloaf mix will suffice)
salt n pepper (or your favorite seasonings)
1 can of cream corn
1 cup of frozen corn (frozen corn has more flavor than canned corn)
5-6 medium potatoes (boiled and mashed)

Cook the ground beef in a skillet till golden brown. Add the salt n pepper and favorite seasonings while cooking meat. I also sometimes add a sauteed onion and crushed garlic for more flavor.

When meat is finished drain all the grease and cover bottom of 9 x 13 baking dish.

Cover the meat with the can of cream corn and add a layer of the frozen corn.

Lastly cover top with mashed potatoes. You can also sprinkle some cheese and paprika over top for flavor.

Bake in over for 30-45 minutes. Let rest for 5-10 minutes before serving.


This is one of those dishes that gets better with age. We find that the second day is much better than the first.


So when you are in a bind for what to make for dinner, if you have corn, ground meat, and potatoes try this great Yummy dish.

YUM!!!

Monday, December 19, 2011

Carlo's Bakery

A couple of weeks ago my family and I went on a weekend road trip to New Jersey to see a play, The Nutcracker & I, another family member had in production. We really had no plans for the weekend other than the play and thought we would just make it up as we went along. When we checked into our hotel in New Jersey we found out we were 5 miles from the TV famous Carlo's Bakery in Hoboken, NJ. Since my family is Italian and love Modern Pastry in North End, we knew this Bakery was going to be one of our stops.

The town of Hoboken is very sweet and adorable. We wished we had more time to walk down the road the bakery is on, but our time waiting to get into the bakery consumed most of our time. In Hoboken there are so many little shops, and restaurants to stop at, so we decided the the next time we come we are most definitely going to spend more time in Hoboken, NJ to explore. You see the reason we did not have time was going to this bakery is an all day affair, it took us about four hours from the time we got in line to the time I made my purchase. We got in line around 10:am and got a number, around noonish we were in front of the bakery awaiting to go in, around 1:30/2:pm I made my purchase.

When you get inside the small Bakery the smell brings you to a true Italian Bakery. There are cakes, cookies, pastries of all kinds to drool over in crystal clear glass cases. Which makes it so hard to decide what you want to bring home. The one thing to remember is we still had to wait for our number to be called once we were inside the bakery, but those smells wafting from the kitchen were enough to fill my belly till #71 was called.


Italian Cookies


Cheesecakes


The night before my Mom & I went on the Carlo's web site to think about what kind of treat we wanted to take home with us. There are so many to choose from but since I have my favorite that would be what I would get, sfoilletella.


If you are a reader of my blog you already know I go to the North End to get sfoilletella early on a Saturday morning when they are still hot to bring home for desert that afternoon. These are my favorite treats and I am quite picky when it comes to them. Only Modern Pastry in the North End makes the best (you can also get them at Caffe Victoria's with a cafe latte, since they get theirs from Modern Pastry). In my opinion they cannot have candied fruit in them and they must be the right mix of textures, from soft creamy interior to crunchy, flaky exterior.


I know I have high standards but I had to see if this bakery could live up to them. At first glance I noticed they are much smaller than the ones you get in the North End, but they looked so yummy.


My tied box of treats


Sfoilletella


As you can see I picked up a half dozen of them. We waited till we got home to have our treats, and found that the Modern Pastry still has the best Sfoilletella around. The ones from Carlo's did not have any candied fruit, which is good, and had great texture, but there was something off with the flavor and none of us could figure it out. So the next time we pick up some Sfoilletella we are going to the North End.


The one thing I will say is we went to Carlo's Bakery, we missed the Cake Boss, at least we have family photos of us in front of the bakery, and a good story to tell our grand-children.


YUM!!!


Sunday, December 4, 2011

Pickity Place

This week my Mom & I decided to go on an adventure to Pickity Place in Mason, NH. I personally have never gone but my Mom was there once with her Garden Club, but it was so long ago she was excited to go again. After I read about it I knew this would be the perfect place.

We drove and drove to get there, and we drove mostly back roads, through the woods. And how funny that we drove through the woods since the house the restaurant is in, is the original House that the story Little Red Riding Hood was illustrated from. There is even this huge oak tree in front of the house that is in the book as well.


The house is so old there are really no level floors, low ceilings, narrow doorways, and three small rooms to eat it. The grounds and the samll cottage have such a New Hampshire feeling you cannot help but fall in love the minute you step out of your car. Over the past few years it looks like they have added a solarium to eat in that overlooks the gardens, which must be so beautiful in the summertime.

The nice thing about going here is they have a fixed 5 course menu that changes each month. Since we just went last week if you go between now and the end of December you can experience the same menu. This is what we had ...


Crackers with Sun Dried Tomato Pesto Spread


Golden Russet and Creamy Carrot Soup


Apple Pecan Slaw


Winter Solstice Fruit Bread with Cranberry Lemon Butter


Chicken & Eggplant Neapolitan

or

Winter Vegetable Cassoulet


Pickled Red Cabbage


Brandied Eggnog Pie


When you look at the menu they always have a Vegetarian dish on the menu (that was the one I had) and it was so good I forgot they was no meat or chicken. Every course is delivered to you, with some kind of herbs that came right from their garden, how awesome is that.


All I know id the menu for January looks like comfort food at its max I am looking for someone to go with me? Any takers ... I know you will live every morsel that you eat.


YUM!!!

Sunday, November 13, 2011

Cranberry Muffins

A couple of weeks ago a relative of mine was leaving for Florida for the winter and was cleaning out their fridge for the winter and found a bag of cranberries, and some how these cranberries ended up in my freezer. I was thinking I would make home-made cranberry sauce for our Annual Turkey Dinner, but instead I made muffins.

You see I am from Massachusetts where I think the most cranberries are produced annually, at Ocean Spray in Plymouth, MA. You must understand that as a kid in school one field trip a year in Elementary School is to the Mayflower ship, Plymouth Rock, and the Ocean Spray factory. Cranberries are a very cool fruit, not only how they grow but especially how they are harvested by flooding the bogs and skimming the surface to harvest all the little berries. Berries that pack almost as much flavor in them as Pom berries from Pomegranates.

Cranberries are not always the first fruit I go to when I am making muffins. I usually think of bananas or apples, but it is fall in New England and cranberries are the in fruit now. The funny thing about cranberries, much like Toll House Chocolate Chips, there is a recipe for Cranberry Nut Bread on the package, that was the starting point to these muffins.

This is what I did ...
Cranberry Muffins
2 cups of flour
1 cup of sugar
1 teaspoon baking powder
1 teaspoon baking soda
1/2 teaspoon salt
1 teaspoon cinnamon
1/2 teaspoon nutmeg
1 tablespoon vegetable oil
3/4 cup of orange juice
1 egg
2 cups of cranberries
2 teaspoons of sugar

Preheat oven to 350 degrees. Prepare muffin pan by lining the muffin cups.

Mix all the dry ingredients in a bowl. Add the wet ingredients and mix till combined. If you are using a mixer at this point you are finished with the "power tool." Gently fold in the cranberries, being careful not to burst any.

Put approximately 1/4 of a cup of batter in each muffin cup and sprinkle with sugar over top.

Bake for 25 minutes or until when toothpick inserted come out clean.


These muffins we found to be tart more than sweet, which is a welcoming change to the norm. You can of course always add 1 tablespoon of orange zest to punch up the orange flavor, or you could add some crushed walnuts.

Welcome Autumn in New England!!!

YUM!!!

Monday, November 7, 2011

Almond Macaroons

Cookies, cookies, cookies I love cookies and when they are Italian cookies I love them even more than you know. I think I mentioned before that as a kid my first job was at an Italian bakery. When you work at a bakery you find your favorites and those are what you seem to eat all the time. You also get to be part of the "test kitchen" when new cakes, treats and cookies are being made for the first time.

Since I love Italian cookies I ate a lot of them, butter cookies that have sprinkles (or as we call them in Boston Jimmies) around the edges are my favorite, and in the bakery we call them champagne cookies. And my second favorite cookie is an almond Macaroon. They are crunchy on the outside and chewy in the inside. Sometimes they are topped with candied cherries, slivered almonds, or pine nuts, but I prefer them just plain and simple.

The other night I took a batch to a party my Italian family was having and there were none left on the plate at the end of the evening. It was so nice to hear my aunt ask where the cookies were purchased, when I told her they were home-made. These cookies are super easy and always come out great.

This is how to make them ...
Almond Macaroons
8 oz. can of almond paste
1 cup of sugar
2 large eggs, whites only, room temperature

options: red or green cherries, toasted almond slivers, toasted pine nuts

Preheat oven 350 degrees. Line two cookie sheets with parchment paper.

In a stand mixer combine almond paste and sugar, beat until blended. add egg whites and beat until smooth.

Scoop up 1 teaspoon and roll into a ball and place on prepared baking sheet, put slivered almonds, cherries or pine nuts on.


Bake 15-17 minutes until cookies are browned.

I have made a version of these with one tablespoon of orange zest (using only the skin of the orange), to the batter to make Almond Orange Macaroons.

So Yummy and so easy to make!!!

YUM!!!

Chicken Barley Soup

As you all know I love soup. I love making soup, eating soup and trying new soup recipes. Soup to me is the ultimate comfort food. I think if I had the choice I would eat soup everyday. The way I look at it you get protein and veggies all in one flavorful bite. And soup always has left-overs which taste better as they age and all the flavors marry together. Thinking of this is making me salivate.

I was reading Everyday Food Magazine and I found a new way to cook chicken soup. Yes, a new way. I love my recipe for soup (which has been handed down from my grandparents), but when another comes along I will be the first to try it and not hesitate one bit. This one is a bit unique in that it has spinach and barley added.

This is what I did ...
Chicken Barley Soup
1 tablespoon of olive oil
4 carrots sliced
4 celery stalks (if they have leaves on them I add the leaves too)
1 medium onion diced
4 boneless skinless chicken thighs cut into 1/2" pieces
salt-n-pepper
6 cups of organic chicken broth/stock
2 teaspoons of dried thyme
1 cup of quick-cooking barley
5 cups of baby spinach (one bunch)

In a large dutch oven or stock pot heat the olive oil with the celery, carrots, onion cook until tender (about 8 minutes). Add the chciken and season with salt-n-pepper and cook till chicken is browned on edges.

Add the broth/stock and thyme and bring to a boil. Stir in the barley, cover and reduce heat and simmer till barley is tender and chicken is cooked (10-12 minutes).

Last add the spinach and cook until wilted (1 minute). Season with salt-n-pepper if needed.


The spinach made this dish more veggie/green like and the barley made it more filling without adding pasta. Barley lately seems to be my new go to for fillers in soups over pasta since it is better for you and gluten free.


Try this one ... super easy to make and can be made in less than 30 minutes if you have left over chicken or a rotisserie chicken from the market. So healthy and so yummy.

YUM!!!

Sunday, September 25, 2011

Cornbread/Corn Muffins

Last week I made chili for the Pat's game viewing at our house. When I made the chili I made it two, maybe three alarm and needed to put the fire out on our palettes some how, and thought bread would be good. But really did not want just white bread. Then it came to me, cornbread!!!

I have never made cornbread before and really thought I was not really a cornbread fan. Think about it every time you stop by Boston Market to get a quick dinner they seem to give cornbread but most of ours seems to go in the trash. This month thought cornbread was one of the feature recipes in Everyday Food magazine. (Yes, I love Everyday Food magazine.) And for some reason the cornbread looked so good and looked so easy to make, so I thought why not make cornbread to put the "chili fire out."

The one thing I have to say is when I made my cornbread I wanted to make it "user friendly." Meaning I made corn muffins with the same recipe so everyone could take a bowl of chili and a muffin. Such a good idea when there is a crowd. And I could freeze all the ones we did not eat for the next time I make chili or want a corn muffin with butter for breakfast.

This is what I did ...

Cornbread

1/2 cup or 1 stick of unsalted butter at room temperature
1 1/2 cup of yellow cornmeal
1 cup of leveled all purpose flour
6 tablespoons of sugar
1 1/2 teaspoons baking powder
1 teaspoon of salt (if you only have salted butter omit this salt)
1/2 teaspoon baking soda
1 cup of buttermilk
3 large eggs

Preheat your oven to 400 degrees. Either butter an 8" baking pan or line a muffin pan with cupcake liners.

In a large bowl mix the dry ingredients in a large bowl; cornmeal, flour, sugar, baking powder, salt, and baking soda. In a second bowl mix the wet ingredients; melted butter, buttermilk & eggs. Add the dry ingredients to the wet and stir till combined, but do not over mix.

Transfer to pan or muffin cups and bake.

When making one bread bake for 20-25 minutes, when making muffins bake for 12-15 minutes. In both cases bake till toothpick when inserted in center comes out clean.


This cornbread recipe came out so good, not too sweet and not too savory, they were pretty much perfect. I think there are many ways this cornbread base can go from sweet to savory with other flavors added to it as well.


Try this even if you are not a fan of cornbread, you might be like me and like it after all.


YUM!!!

Daddy Dan's Famous Chili

This is my favorite time of year, for a couple of reasons; one is the the leaves are changing and the air is getting colder, and the other is football season is here. I cannot tell a lie I do love to watch the home team (New England Patriots), as well as all the other Sunday afternoon games. Football watching in our house is also a social thing to do and that means so much good food while watching the game.

This weekend the Pat's are away so there will be be some friends here to watch the game. What to make is the big question? Chili!!!

About 20 years ago my Dad was in a Chili cook-off, and his was one of the top 5. His recipe is one that can be hot or can be not so hot. But one thing for sure it is so yummy and a crowd pleaser. It has heat when you eat it, then the flavors of the chili and then after heat that makes you go back for more.

This is what do ...
Daddy Dan's Famous Chili
3 tablespoons of olive oil
2 cloves of garlic, minced
1 medium onion, diced
1 jalapeno, diced (omit if you do not like you chili hot)
2 lb. of beef tips, cut into one in cubes
1 bottle of beer (no stout), I used New Castle Brown Ale
1 cup of water
2 can of diced tomatoes
2 can of dark red kidney beans, drained
2 teaspoons of salt
1 teaspoon of black pepper
1/8 teaspoon dried sage
1/2 teaspoon dried oregano
1/4 teaspoon cayenne pepper
1 teaspoon cumin
1 table spoon chili power

In a large stock pot saute the garlic, onions and jalapeno with a pinch of salt till onions are browned. Add the beef and the spices/aromatics. Simmer till beef is browned on all sides (5-8 minutes).

Add the tomatoes, water and beer, bring to a boil and simmer for 2 1/2-3 hours.

After 3 hours remove the beef and pull apart like pulled pork.

Add the beans and stir for 10 minutes and serve, or allow to fully cool before setting aside in the fridge for the next day.


I shoul tell you that when I made this I made a smaller batch and cut the tomatoes, beans, and meat in half to make a smaller pot. But I did keep all the aromatics in the same quantity for intense flavor.

Keep in mind that this is a dish that need to be made the day before. All the flavors of Chili need to marry together and settle before you can really enjoy how good it is, and watch some of the game while it is heating up on the stove for a half time meal.

As you can see we added some fresh avacado and diced sweet white onions, and fresh cilantro to our chili and served it with corn bread (to help pt out the "fire", recipe to come this week). You can also add cheese, but since we are lactose intollerant we can do without the cheese and still love every bite.

If you try this recipe let me know and I will tell Dad, he loves to hear who I pass this recipe on to and what they think of it.

YUM!!!!

Sunday, September 11, 2011

Chicken Supreme

I am always on a quest to find new things to cook for my husband and I. Cooking the same thing every week gets really really boring in my opinion so I am constantly looking all the time for new recipes. Let me start by saying I subscribe to Daily Candy, an on-line site that sends you a Daily message about "eye" candy that is sometimes useful but mostly is stuff I dream about. Every day I look forward to the Candy no matter what it is. Last week Daily Candy sent me a email Titled "What's for Dinner?" This really intrigued me, I had to find out more about it.


It was all about an on-line web site dedicated to helping you find what you want to eat for dinner based on what you tell, such as meat, veggie, etc. The site is called Gojee, and I suggest you all get a Gojee account. I love it, and I have only used it once. Gojee is all about other recipe blogs and how to find the perfect meal to make for dinner. You see when you find a recipe you like Gojee links you to the blog that the recipe is on so you can view it, print it, etc. The nice thing is you can save your recipes on the Gojee site for later reference and not worry about where you were linked to.


I got very excited about this and set up an account right away, and started searching for new recipes to create. We seem to always have chicken thighs on hand so I thought lets look for a new recipe using thighs. There are so many it was very hard to choose what would be my first one. But there was one that sounded really good that I had to try it ... Chicken Supreme, which was originally from Taste and Tell (blog).

This is how to make Chicken Supreme
5-6 boneless & skinless chicken thighs
3/4 teaspoon of seasoned salt (I used Pappy's Choice)
pinch of paprika
1 cup chicken stock/broth
1/4 cup white wine (I used white cooking wine you can purchase at the grocery store)
1/4 cup diced onion
1/4 teaspoon curry powder
pinch of fresh cracked pepper
2 tablespoons of all-purpose flour
1/4 cup cold water
1 cup sliced mushrooms (10 sliced button mushrooms)
olive oil

Preheat oven to 350 degrees. Sprinkle thighs with seasoned salt and paprika. Place chicken in a 9x13 baking dish.

In a small bowl combine chicken broth, wine, onions, curry powder and pepper. Pour over chicken. cover with foil. Bake for 30 minutes, then uncover and bake for 45 minutes, or until chicken is done.

While the chicken is in the oven, heat a small amount of oil in a skillet and saute the mushrooms till tender. set them aside.

When chicken is done remove from oven. Take the chicken out of pan and cover to keep warm. Strain the pan juices and reserve for the sauce.

In a small sauce pan whisk the flour and water, slowly whisk in the pan juices. Cook on low heat and whisk until sauce get thicker. Boil for 3-4 minutes. Add the mushrooms to the sauce.

Serve chicken with the sauce.


As you can see we also had some sauteed asparagus with it. It was so yummy!!! we both used the bread to sop up all the sauce left behind on our plates.


YUM!!!

Tuesday, September 6, 2011

Creamless Corn Chowder

This is one of those recipes that we have been looking for, for such a long time. As you already know my husband is lactose intolerant and seems to like to eat everything that has cream, milk and cheese in it, and regrets eating all those things a few hours later. So every time I find a recipe that usually has dairy in it but can be made without it I jump to make it. For a couple of reasons; (1) to see how good it is without diary and (2) to see if my husband would love it as much as the original.


Sunday morning I was drinking tea & eating toast flipping through the ads in the Sunday paper and came across this recipe in the USA Weekend magazine. For some reason every Sunday I flip through the USA Weekend for celebrity birthdays and the occasional feel good story, and this week for the awesome recipe I found. Since my husband and I both love corn chowder but just cannot eat it because it has too much dairy, this is such a refreshing change to a great chowder. I knew I had to try this recipe and see how yummy it is without cream.

This is what I did ...

Creamless Corn Chowder
2 cups of frozen corn
2 cups of cream of corn (I used one can of cream of corn)
1 large onion, medium dice
1/2 red pepper medium dice
2 large potatoes (I used two large Yukon Gold potatoes) medium dice
salt n pepper
4 slices of bacon (chopped)
1 teaspoon if dried thyme
1 quart of chicken broth/stock
2 tablespoons of fresh cilantro

Slice the bacon into small pieces and put in a large stock pot and fry over medium-high heat until crisp (5-7 minutes). Chop the onion and the pepper and season with salt and pepper. Add the onion & pepper to the bacon and saute. After the onions start to sweat add the cream corn and thyme. Stir to combine. Add the frozen corn, potatoes and chicken broth. Let simmer for 30 minutes.

Serve with a sprig of fresh cilantro.


This was such a yummy dish, even my husband loved it. He is now waiting for the cold to come so we can eat chowder by the fireplace on a cold winter day.


If you or anyone in your home is lactose intolerant this is a recipe for you, there is so much flavor you will not even miss the dairy.


YUM!!!

Friday, September 2, 2011

Succotash

Let's talk about Succotash today. This is one side dish I really had no idea what it was, not thought I would ever be so much in love with Succotash that I would make it so often. It all started a few months ago I went to all places The Cheesecake Factory for lunch with some family. They had this great BBQ Salmon dish with mashed potatoes and corn with veggies in it. I knew after I ate it I had to replicate it for my husband, because I knew he would love it.

The big question is what is a Succotash ... The definition of Succotash is "boiled corn kernels" in a dish primarily of corn and/or Lima beans/shelled beans, other ingredients can be added to it such as tomatoes, and green or red bell peppers. Because of the relatively inexpensive and more readily available ingredients, the dish was popular during the during the Great Depression, and with today's market going up & down why not try a cheep side dish for your family.

The fact that Succotash is so easy to make, makes it a perfect side dish in our house... and have I mentioned that my husband loves corn.

My Succotash is made this way
1 -1 1/2 cups of frozen corn
half red bell pepper diced
half zucchini diced
1 tablespoon organic butter
salt-n-pepper to taste

Mix the ingredients in a small sauce pan. Put on stove top on high, and stir constantly till butter is melted. When butter is melted cover and turn off heat. The steam from the corn will keep the veggies warm till you eat them.


The nice thing about Succotash is all you need is corn and diced veggies and you can make it your own. when you make your own ... share it with me, I am always looking for new veggies to add to my corn.

YUM!!!

Tuesday, August 16, 2011

Roasted Beef, Mushrooms and Barley Soup

It is the middle of of one of the hottest summers on record and for some reason the other day I was craving hot soup. Sometimes when I crave soup I just open a can and heat it up over the stove and slurp away. This week was different than other summer days ... I wanted real home made soup, that was quick and hearty. (I was also just at a family party and everyone was talking about my cooking and why have I not posted anything in a while. It in a way inspired me to make this soup also.) But I digress ... back to the original recipe.

This was a soup that I originally found in Everyday Food Magazine and it looked so easy and so yummy I had to give it a whirl. It only has 5 real ingredients!!! Funny how I sound like a TV show on Food Network all of a sudden. But it is is true. It seriously only has 5 ingredients that make this one of the easiest, hearty and flavorful soups you will ever eat, in my opinion.

Beef, Mushroom & Barley Soup
1 lb. of beef chuck cut into 1" cubes
1 lb. of button mushrooms (steamed and cut in half)
1 cup of chopped onions (can be anything shallots, red, vadalia, pearl or white)
salt n pepper
2 tablespoons of olive oil
4 cups of beef broth
1/2 cup of quick cooking barley

On a cookie sheet spread out the onions, mushrooms, and beef to make one layer. Drizzle the olive oil over it and season with salt n pepper, in a 400 degree oven for 30 minutes to brown .

Remove form the oven and transfer to a dutch oven or stock pot. Add the barley and the beef broth. Bring to a boil and simmer till barley is soft, approximately 12 minutes.


I have made this soup for many family & friends and they have all been very happy with the dish. This is one of those dishes that is so much better the next day and the day after.


Try this one ... it takes less than an hour and is so easy.


YUM!!!

Tuesday, April 5, 2011

Stuffed Turkey Breast

One thing everyone should know about me is I love to shop at Costco for crazy things like toilet paper, paper towels, and poultry. Yes poultry!!! I find that Costco has great chicken and turkey, and at such good prices it is sometimes hard for me not to purchase it when I am shopping.

A few weeks ago I was having coffee with some friends, and we were talking about all the ways we make turkey, from stuffed, to glazes, to fixings with it. Then the turkey breast came up in conversation. I had never thought to make just a breast before. The brain started working. The idea I had was what if I butterflied the turkey breast and stuffed it with stuffing and wrapped it in bacon, and bake it. You know anything in bacon tastes good.


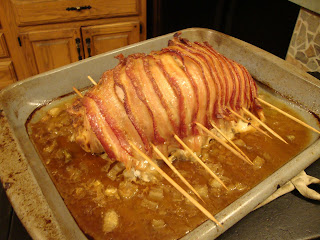
That is exactly what I did. My husband helped me with the butterflying of the meat. When my husband was in high school he was a part time butcher at a small grocery store, where he learned how to cut meat like a pro. After the turkey was cut I pounded it a bit to tenderize it and make it flat. Next the stuffing was added (I used mt own recipe for homemade stuffing with pecans & dried cranberries). This is when it gets tough ... the stuffing must be placed in a log like shape at one end of the breast. Then roll the stuffing inside the turkey.


This was really starting to look good but it needed something to make it really juicy. That would be bacon. I used a half a pound of maple cured bacon to wrap the complete exterior of the rolled breast. We also used skews to hold the roll in place while cooking. A 1 - 1 1/2 cup of chicken stock was added to bottom of the pan for some liquid on the bottom of the pan, and a medium onion diced and added to the bbroth for flavor.


This is what it looked like when it came out of the oven. We let it rest for a few before cutting it so the juices would stay in the meat.


When the turkey was cut it was a perfect pinwheel. The maple flavor of the bacon and the tart dried cranberries in the stuffing give each bit of this pleasing to the palette.


This was the first time I made this dish and was a bit nervous, because I was having a few friends over for dinner that night and was hoping it would be good. As it turns out it was great and one of our guests said "this is something I would have expected to get at a restaurant." that made me feel so good.


Note to Self: Get another turkey breast on my next trip to Costco.


One last thing to mention is that when the turkey came out of the pan and they was "juice" left behind I strained and de-fatted the liquid put it in a small sauce pan, added 2-3 tablespoons of unsalted butter and a tablespoon of flour and whisked to make gravy. The gravy helped to tie the entire dish together.


YUM!!!

Friday, April 1, 2011

Aprile's European Resturant

I know I have not blogged in a while about my cooking, baking or eating out. Lots has been going on in my life that took precedence over blogging. I also became very disillusioned by some about my blogging that a needed break was good for the soul to get myself back on track. Now that I am back my blog will be including more "Eating Out" places. Eating out is such a huge part of our life that it should show more here in my blog. I will still be posting recipes of yummy things that I make but also talking about all those good chefs out there that sometimes don't get the recognition they deserve. Hope you enjoy ... The other day my husband was asking me where I wanted to have dinner that night. To be totally honest I love to cook but the days I work I really have no desire to rush home, make dinner, and clean up. When I could have someone else do all the work and totally enjoy myself.
It was a Friday night, Date Night to be exact and a new restaurant opened a few months ago in my town. And since I am very into eating local, even if that means keeping the business in town I am all for it. The place is called Aprile's European Restaurant and it is located in an old mill building right on the train tracks, with a river running right next to it. Very lovely setting.


This location has been a restaurant for a long time but all the other ones seemed to have failed after a couple of years. Many times I tried to eat there when it was something else again and again but it just was not good. From the moment we walked into the new Restaurant there was a good feeling. Many folks dining in the open dining room, the wait staff bustling around delivering food and drinks to all those eating. We knew this time this was going to be a good place to eat. We found two seats at the bar and settled in for our experience.


The Restaurant is very Italian so it was going to be a red wine night, we chose the Cigar Box Malbec and it was very good choice. We then moved on to the stuffed mushrooms (they were stuffed with spinach and cheese). There was not one left when we were ready for our main course.


I got the Chianti Braised Short Ribs with Cipollini Onions, Asparagus Tips, Red Bliss Mashed, Braising Jus. I have this theory that anything braised (ie cooked low and slow) has to be yummy since much care has to be put into it since it takes so long too cook. The meat was so tender and the veggies were like candy. Even the lady who sat next to me got the same thing after seeing mine. We both could not figure out why we had a knife on our plate since it was not necessary to cut the meat with, so I dubbed it "plate decoration."


My husband got the Parmigiana Eggplant Breaded and Baked with Tomato Sauce and Mozzarella Cheese Accompanied with Linguine. Which is what he gets when we eat out since i do not like Eggplant but he does.

We also decided to share dessert. This is very much out of the norm for us, my husband does not like chocolate or sweets for that matter. The funny thing is I can get him to eat Tiramisu. That is exactly what we got. It was such a good ending to a very good meal, we left none behind.

Dinner was so yummy from start to finish I had to talk about it more than a Yelp post or a Tweet. If anyone is in the Merrimack Valley/Chelmsford MA area and is looking for Italian food try Aprile's European hopefully you will love it as much as we did.

Sunday, December 26, 2010

Phyllo-Wrapped Brie

This time of year so many of us are entertaining and going to parties. And when the hostess says can you bring something to share? You have no idea what to take or what will others like.

A few years ago I was hosting a dinner party and I wanted to make something different, but was totally had no idea what to make. After much Internet searching I found the perfect appetizer ... Phyllo-Wrapped Brie. I found it on Better Homes & Garden website, a place I would not normally look at, but it looked so good in the picture I had to try it.

This is what I did ...

3 tablespoons of unsalted butter
4 medium onions, cut into thin wedges (about 2 cups)
2 teaspoons sugar
1/4 cup crushed pecans
8 sheets (17x12 inches) frozen phyllo dough, thawed
1 stick of unsalted butter, melted
1 round of Brie
4 tablespoons of apricot spreadable fruit

Melt the 3 tablespoons of unsalted butter in a large saucepan. Add onion. Cover and cook over medium-low heat about 10 minutes or until onion is tender and golden, stirring occasionally. Sprinkle sugar over onion. Cook, covered, for 10 minutes more or until browned, stirring occasionally. Stir in pecans & set aside.

Work with one sheet of phyllo at a time, keeping remaining sheets covered with plastic wrap until needed. Lightly brush one sheet of phyllo dough with some melted unsalted butter. Place another sheet of phyllo dough on top of the first sheet, and brush with unsalted butter. Repeat with two more sheets of phyllo, brushing with unsalted butter.

Slice round of Brie in half horizontally, keeping it in its "wheel" form. Place bottom half in center of phyllo stack. Spread with 2 tablespoon of the apricot spreadable fruit; top with one-half of the caramelized onion-pecan mixture. Top with other half of Brie, 2 tablespoon spreadable fruit, and another one-half of onion-pecan mixture. Wrap phyllo up and over filling, pleating phyllo as needed to cover and slightly twisting phyllo on top. Brush phyllo with unsalted butter.

Place one wrapped Brie round 13x9x2-inch baking pan/cookie sheet. Cover and chill up to 24 hours. Bake in a 400 degree F oven about 20 minutes or until golden. Let stand 5 to 10 minutes. Serve with Melba thins. Makes 12 servings.


This has been a hit every time I make this dish. I would love to have taken my own picture of this, but it is eaten up so fast. A close friend of mine calls this "heaven on a plate." That is how good this is.

There are a few variations you can do to this recipe. Such as you can use any shape Brie you can find, they all come out yummy. Also if you do not like pecans you can also use hazelnuts or walnuts. (We love pecans so where ever we can use them, we do.) Another thing you can do is serve it with sliced apples, sliced pears and bread, but I have found that the Melba thins work the best because they are so hard they hold the brie and yummy goodness much better.

You may think that this looks hard to make but there is so much room for not perfect when it comes to the phyllo dough. Please try this you and your guests will love this.

YUM!!!

Monday, November 29, 2010

Tea at the Four Season's Boston

A couple of weeks ago my cousin and I went to the Four Season's Boston for High Tea. It was a cold November afternoon and this was a perfect way to finish a day filled with shopping and walking all over the city.

I am a fan of High Tea and love to go to all the hotels in the city for tea and see who has the best tea, treats and ambiance. The Four Season's Boston is so beautiful since it overlooks the park, and this time of year the park is full of skaters, lights and happy people walking. We may live in one of the coldest cities in the country but we do make the best of the cold days, and look beautiful in our coats, hats & scarfs.

Boston is a famous place to have tea since the most famous "tea event" happened here ... The Boston Tea Party, in 1773. It was a cold December night, when a small band of colonists threw 340 chests of tea into the Boston Harbour as a sign of protest against “taxation without representation.” It was the beginning of a chain reaction that eventually led to the Declaration of Independence.

"Today, afternoon tea is no longer a sign of protest – it is a civilized, refined respite from the taxing pace of the day’s activities." - Four Season's

This is what we had ...
Scones and Tea Bread
Strawberry Jam, Lemon Curd and Devonshire Cream

Selection of Tea Sandwiches and Pastries


Served with a Pot of Brewed Tea of Your choice
Gunpowder – Organic Variety of Rolled Chinese Green Tea with a Crisp Refreshing Flavour
Crimson Berry – Lively Herbal Tea Made with Elderberries, Grapes, Currants, Bilberries and Hibiscus
Wild Mint – This Mint Herbal Tea is very Aromatic, but not Sharp. A Full, Complex and Refreshing Tea
Lemon Camomile – Herbal Tea, Blending the Camomile with Lemongrass and Lavender Flowers


All the treats that were served were so yummy and very traditional for tea. We had sandwiches such as cucumber, curried chicken, and smoked salmon. Sweets such as lemon tartlets, profiteroles filled with whipped cream and raspberry, a lemon poppy bread, and how can I forget scones. Scones that were warm when they were delivered to the table and tasted so full of flavor with tea.

The best part of going out for tea is how relaxing tea is and how much uninterrupted time you can spend with a person when you are having tea. There is no need to have your cell phone on, and ll that matters is what is in front of you ... the company and the treats.

If you have never experienced an outing for tea you should definitely do it. Bring your Mother, Sister, Best Friend, Daughter, etc. This is the perfect way to end a day of shopping, or a day walking around the city in the cold. Tea warms you up and the company you have will warm your soul.

YUM!!!

Peanut-Rasin Granola Bars

Last week I was looking through my pantry for a snack and found so many different granola bars. Some we like and some we are not too fond of but still eat, but there were so many. And they all have such crazy ingredients in them, some I cannot even pronounce, I thought they were healthy treats but when you have no idea what is in them how can be healthy.

I seem to be on the kick on making everything we put in our bodies at my house. It may take a bit of time and energy but in the long run now you know what is it so you know how healthy it is. The other nice thing about making more of the things you eat is the love that you put in each meal you cook. Love translate in taste, flavor, and texture ... believe me when someone makes something with love it shows.

This is how I made my granola bars ...
cooking spray
2 1/2 cups organic rolled oats
1 cup dry roasted peanuts
1 cup of raisins (or 3 boxes of Sunmaid raisins)
1 cup organic sunflower seeds, hulled
1 1/2 teaspoons ground cinnamon
1 1/2 teaspoon ground nutmeg
1 14oz can of sweetened condensed milk
1 stick of unsalted butter, melted

Preheat oven to 325degrees. Line a rimmed cookie sheet with foil and coat with cooking spray.

Mix the oats, peanuts, raisins, seeds, cinnamon, nutmeg, condensed milk and butter in a bowl. Bake in oven till golden brown, about 45 minutes. Cool slightly, flip over, peel off the foil and cut into bars.

These are such a yummy treat when you need a pick-me-up. Thinking of using dried cranberries, mini chocolate chips, and possible chocolate drizzle on future ones. Maybe even candied ginger or dried apricots. Wow the possibilities are endless.

YUM!!!

Sunday, November 28, 2010

Cottage Pie

I would like to start by saying for the past few weeks I have been looking for a mandolin slicer. But I have not been able to find one, or maybe find one I like. So the other day my Mom & Dad came over to visit and they gave me a mandolin slicer they found while they were out shopping. How sweet of them to find a tool I have been looking for. Now no more looking and lets get slicing.

Last months issue of Everyday Food Magazine had a Cottage Pie on the cover. This very beautiful Pie in a casserole dish with thinly sliced potatoes as the "top crust." All I wanted to do was make this beautiful dish. After receiving the mandolin slicer I knew this was the first dish I was going to make with this new kitchen tool.

I am such a fan of comfort food and things that make you feel good inside and out. They make the house smell wonderful in the winter and warm the soul of all those who pop in for a visit unexpectedly during the winter.

This dish has other advantages in that you can use what you have in your fridge to make it. Most of these ingredients can be exchanged for something different and it can still be considered a Cottage Pie. The original way to make Cottage Pie is to use Lamb but since Turkey day was just upon us I substituted Turkey for the Lamb and it was such a yummy idea.

This is what I did ...
3 tablespoons of unsalted butter
1 large onion, diced
2 large carrots, sliced
coarse salt & pepper
2 tablespoons of tomato paste
2 1/2 cups of minced turkey (both dark and white meat)
2 teaspoons of dried thyme
1 cup larger beer
2 tablespoons all-purpose flour
3/4 cup frozen peas
2 Yukon gold potatoes, thinly sliced

Preheat oven to 400 degrees. In a large skillet, heat 1 tablespoon butter over medium-high. Add onion and carrots and cook, stirring often, until onion is soft, 5 minutes. Season with salt and pepper and stir in tomato paste. Add meat and cook, until almost cooked through, 3 minutes. Add thyme and beer and bring to a boil. Cook, stirring frequently, until slightly reduced, 2 minutes. Sprinkle flour over mixture and stir to combine. Add 1 cup water and cook until mixture thickens, about 2 minutes. Stir in peas and season with salt and pepper.
Transfer mixture to a casserole like baking dish. Top with sliced potatoes, overlapping slices. Season potatoes with salt and pepper and drizzle with 2 tablespoons butter. Bake until potatoes are browned around edges and tender when pierced with a knife, 40 to 45 minutes. Then put in broiler for 5-10 minutes to crisp up the edges of the potatoes.

Let sit for 10 minutes to "settle and rest" before serving.


My husband thought this dish was so yummy he cannot wait for me to make it again. We although thought the next time we make it was are going to add 3/4 cup of frozen corn to add another level of sweetness.

As you can see there is so much you can do with this recipe from different meats you can use to veggies that can go in it makes it a frugal find, for what you have in your fridge you can use and it will come out just as yummy. It is so easy and looks so nice when finished it can even make a great casual dinner for you and another couple for a weeknight dinner

YUM!!!